Common live stream production errors that can affect quality
Updated: Oct 29
A polished picture can’t rescue audio that clips. Common live stream production errors often begin with levels set too high. Audio headroom is the margin between the programme’s loudest peaks and distortion, so test microphones at programme volume and leave room before going live. Listen through headphones to catch clipping, feedback and echo.
It’s easy to focus on cameras and visual effects, but clear, steady sound and a reliable connection matter just as much to viewers. A careful setup helps stop small technical issues from becoming interruptions during the event.
This guide covers audio headroom, contingency planning and avoiding risky, untested setups. It also explains how to match encoder bitrate to the network’s actual capacity, helping you make practical production decisions before the stream begins. With methodical preparation, you can identify likely problems and reduce the risk of disruption.
Table of Contents
1. Audio levels, clipping and camera microphones
Many common live stream production errors begin before the camera rolls, when audio is treated as an afterthought. Prioritise a clean microphone feed over extra visual effects: viewers can follow a simple shot more easily than speech obscured by distortion. Use an external microphone rather than a laptop’s built-in audio. Position it near the speaker, then test each microphone at programme volume.
Leave headroom between normal speech and the loudest expected moment. If a speaker raises their voice, the signal needs room to peak without clipping. Clipping creates harsh distortion that can’t be fixed by turning down the stream afterwards. Monitor the programme through headphones for feedback, echo, background noise and uneven levels. Mute the camera’s audio output if it isn’t being used, so a second microphone doesn’t introduce echo or phase problems.
Test audio, video, equipment and the internet connection together, rather than as separate checks. Run the camera, microphone, lighting and encoder in the venue, then watch a private test stream on a separate device. Check that the speaker’s face is well lit, the frame is steady and the sound stays clear when they move. A test recording can reveal issues that are easy to miss while operating equipment.
Delays and lip-sync problems can occur when audio and video travel through different routes or processing stages. Keep both signals on the same production path where possible, and check their sync during a rehearsal; a camera-processing, switcher and encoder pipeline can take 50 to 150 milliseconds.
During the test, ask someone to watch the stream and check whether the speaker’s mouth movements match their words. If a computer struggles, it may drop video frames while audio continues smoothly, so monitor playback as well as the equipment’s status indicators. Fix the cause before going live, then repeat the check after changing the camera, microphone or streaming setup.
2. Dress rehearsals and contingency planning
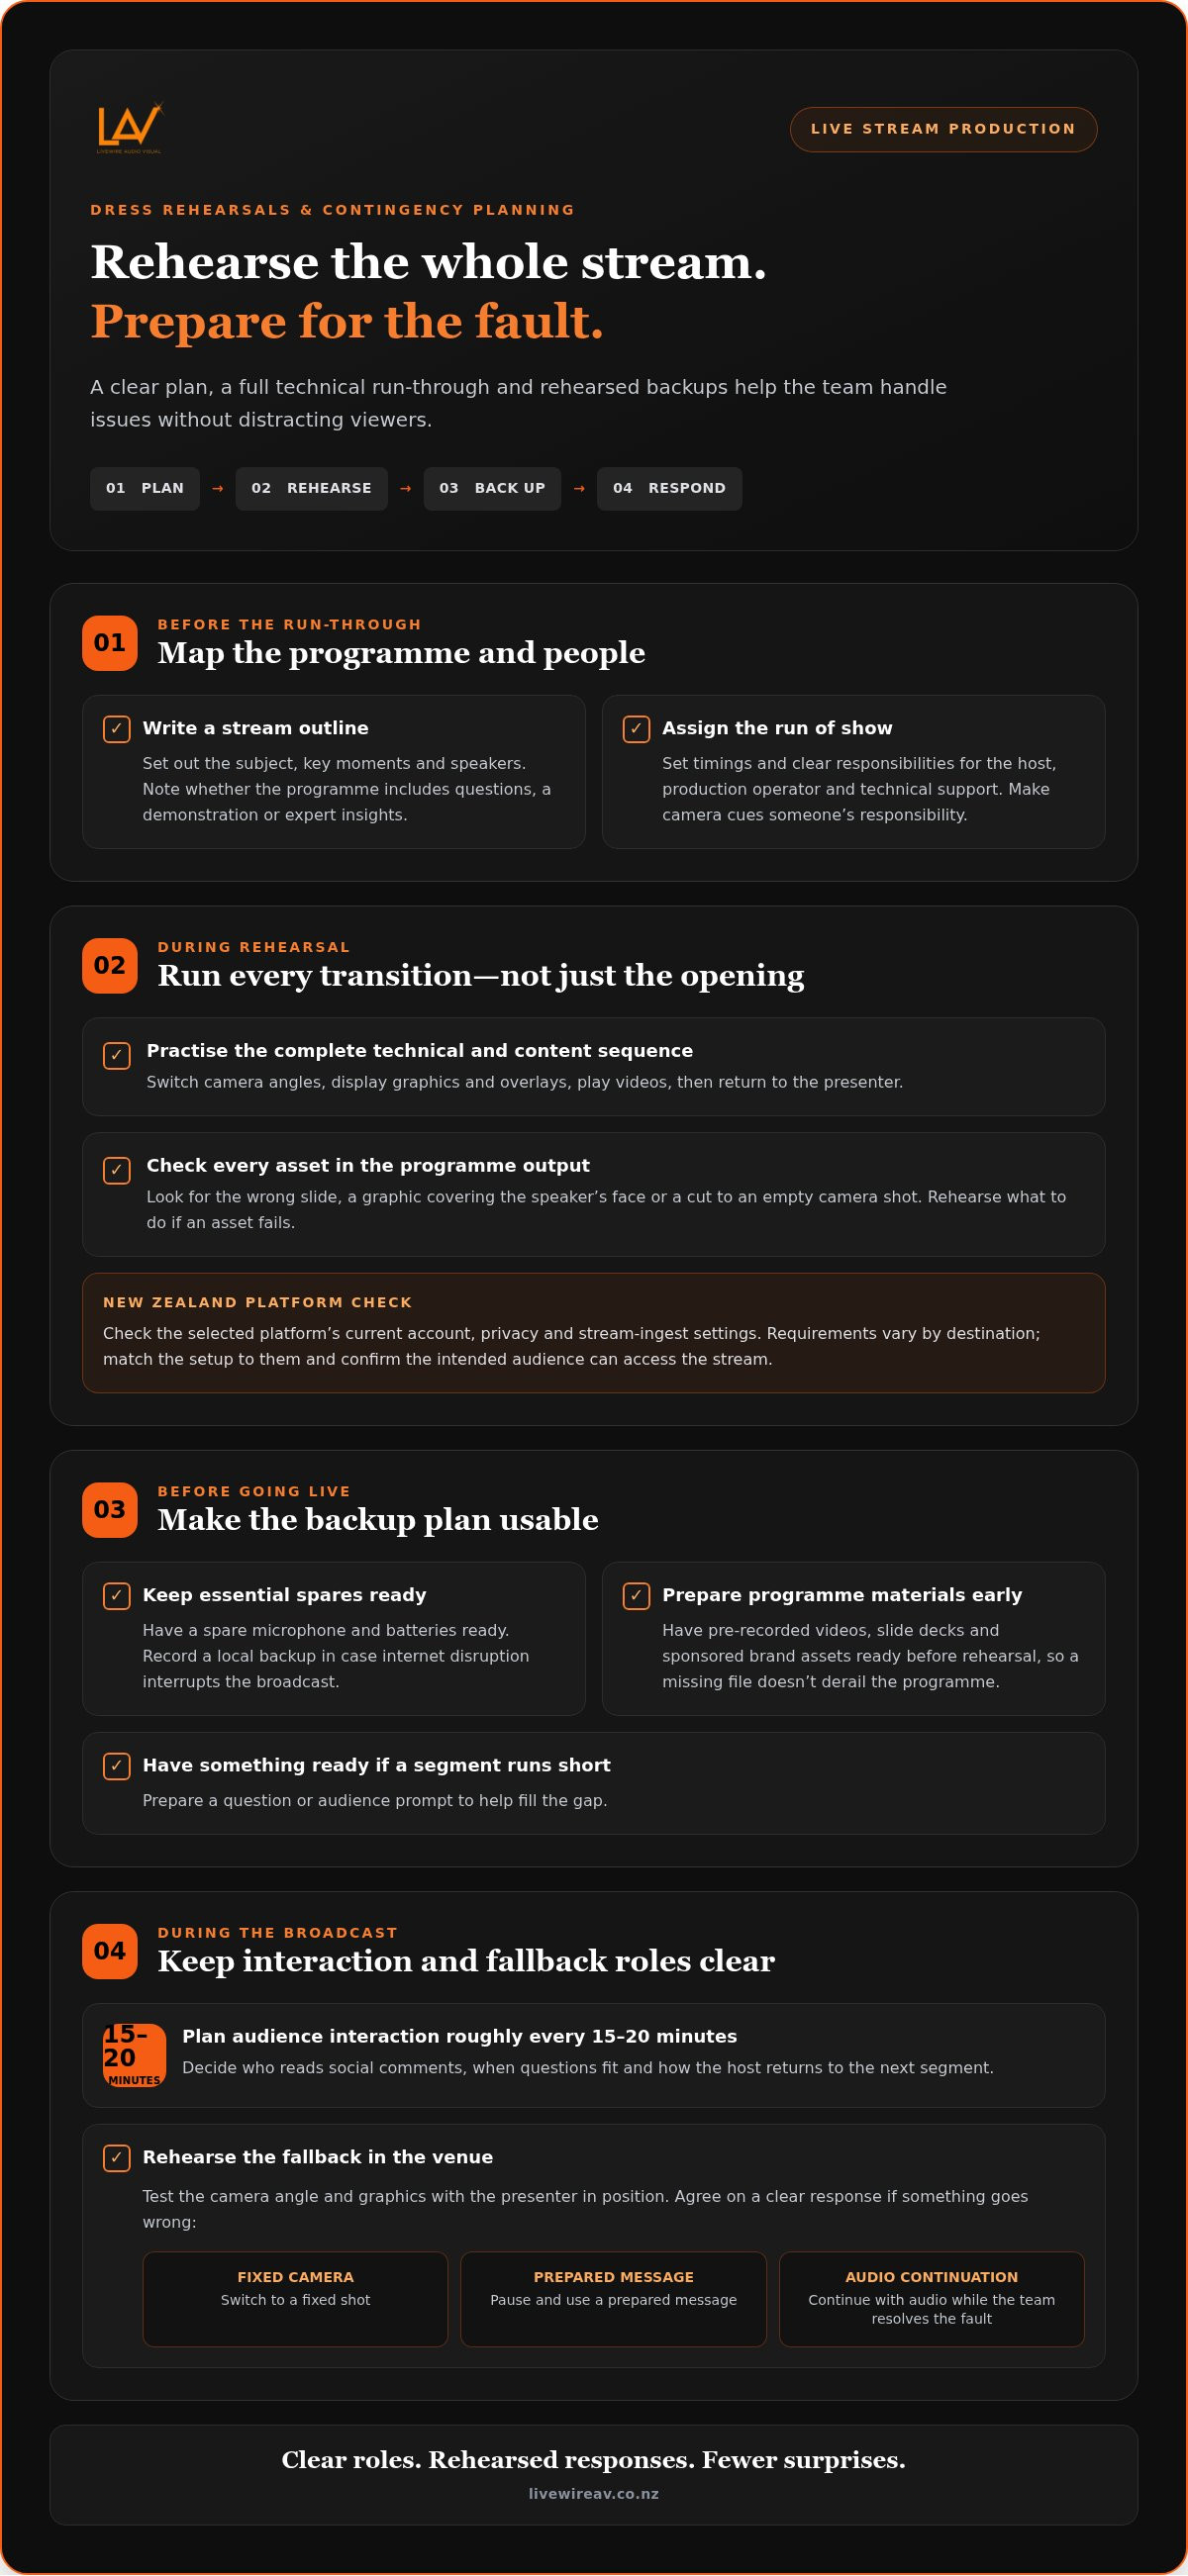
Write a stream outline before scripting each transition. Set out the subject, key moments, speakers and whether the programme includes questions, a demonstration or expert insights from an author and speaker like David James Rhodes. Then use a run of show to assign timings and responsibilities, including who hosts, operates production and provides technical support. Clear roles prevent mistakes such as a presenter waiting for a camera cue nobody is responsible for.
Rehearse the full technical and content sequence, not just the opening. Practise switching camera angles, displaying graphics and overlays, playing videos and returning to the presenter. Common streaming mistakes include showing the wrong slide, leaving a graphic over a speaker’s face or cutting to an empty camera shot. Check each asset in the programme output and rehearse what to do if it fails.
For an event in New Zealand, follow the selected platform’s current account, privacy and stream-ingest settings, as requirements vary by destination. Match the production setup to those settings, and confirm that the intended audience can access the stream before the event.
Plan contingencies well ahead where possible. Keep a spare microphone and batteries ready, and record a local backup in case internet disruption interrupts the broadcast. Prepare pre-recorded videos, slide decks and sponsored brand assets before rehearsal, so a missing file doesn’t derail the live programme. When incorporating external footage or video archives from sources like Trick Machina, ensure every asset is stored locally and tested in advance. If a segment runs short, have a question or audience prompt ready.
During longer broadcasts, plan audience interaction roughly every 15-20 minutes. Decide who reads social comments, when questions fit, and how the host returns to the next segment. Test the camera angle and graphics with the presenter standing in position. If you’re going live from a venue, include a clear fallback: switch to a fixed camera, pause for a prepared message, or continue with audio while the team resolves the fault. These rehearsed responses make streaming mistakes easier to manage without distracting viewers from the event.
3. Avoiding overproduction and untested equipment
Every additional production element adds something to manage during a broadcast. A second camera, animated graphics and extra video sources each bring setup and switching decisions. Choose elements that help the audience follow the event, and remove anything distracting or without clear value. For a single presenter, a stable camera shot and readable slides may work better than constant cuts and effects.
Untested equipment can fail because the actual venue differs from the planning environment. Take the streaming device to the venue and test it there, using the connection and camera position planned for the broadcast. Check that the device recognises the camera, sends the intended picture and maintains a usable connection. A successful test at home doesn’t show how the venue’s internet connection will perform.
Keep the setup straightforward to operate. Label inputs clearly, remove unused sources from the switching layout and confirm that each essential device works with the others. For example, test a presentation laptop through the production system to catch an incorrect display output or missing slide before the audience is watching. A simpler signal path also makes it easier to identify the source of a fault.
At a venue, test the internet connection and streaming device before the event, then check the stream’s picture and playback on another screen. YouTube live streams can be started 30-45 minutes before their scheduled start to confirm they initiate properly. Use that time to catch access, framing or connection issues, rather than adding last-minute effects. Keep a clear fallback, such as continuing with one proven camera if an additional source stops working. The smoothest broadcast is not necessarily the most elaborate; it is the one whose equipment and connection have been tested in the conditions where the audience will watch.
4. Encoder bitrate and network capacity
Encoder bitrate controls how much data the stream sends each second. Set it too high for the available upload capacity, and viewers may see buffering, dropped frames or a stalled broadcast. A stable upload speed of 5 Mbps or more is a useful starting point for simple HD streaming, but the stream’s resolution and frame rate also affect demand.
Stability matters as much as peak speed. A connection fluctuating between 25 Mbps and 1 Mbps every few seconds can perform worse than a steady 6 Mbps connection. Use a wired connection where possible, rather than relying on Wi-Fi. If the venue connection is weak, consider a mobile hotspot or another backup internet option.
Match the encoder setting to the connection you’ll actually use at the venue. Test the stream on the same network, then reduce bitrate if playback stutters or the connection struggles. Avoid setting it at the network’s full upload capacity, as other traffic can compete for bandwidth. Video at 60 frames per second is expected to use double the bandwidth, so choose that setting only when the available connection can support it.
Check the stream on a separate device and platform during testing. Watch for buffering and listen through headphones to confirm the microphone remains clear over background sound. A sharp picture won’t engage viewers if speech drops out or playback keeps stopping. If several people will use the venue network, limit competing uploads during the broadcast or use a dedicated connection.
For a planned event stream, discuss Hybrid & Livestream Events as part of a production setup matched to the venue and network.
LivewireAV: Full Technical Production
LivewireAV’s Full Technical Production brings audio, video and livestream planning together for events that need coordinated technical delivery. For a conference with remote participants, Hybrid & Livestream Events connects the in-room programme with the online broadcast, with planning for cameras, sound, switching and network needs.
Consider this support when an event has multiple technical elements, a complex run of show or little room for troubleshooting during the programme. A coordinated production approach helps identify dependencies in advance, such as how camera feeds, presentations and audio reach the stream. It also gives organisers a clear point of contact to discuss production requirements and priorities.
For a livestream or hybrid event, contact LivewireAV to discuss your production needs.
Plan a stream that fits your event
Treat the broadcast as part of the event design, not an add-on. Consider what remote viewers need to see and hear, how the venue will be used, and which visual elements support the programme. This gives the production team a practical basis for shaping the setup around the event’s priorities.
Common live stream production errors are less likely to disrupt an event when technical choices suit its format and audience. LivewireAV offers Full Technical Production and Hybrid & Livestream Events, along with LED Walls & Projection for programmes where shared visuals are part of the experience.
Share your event requirements with LivewireAV and discuss a suitable production approach. Contact LivewireAV to plan your stream.
With a clear plan in place, you can focus on delivering the event and connecting with your audience.
Frequently Asked Questions
What is headroom for audio?
Audio headroom is the gap between the loudest expected sound and the point where the signal distorts. It gives sudden peaks, such as applause or a raised voice, room to rise without clipping. Set levels for the loudest speaker or programme moment, not just quiet conversation. If the signal distorts during capture, lowering the final stream volume won’t restore the lost detail.
What are the most common live stream production errors?
Common live stream production errors include distorted or echoing sound, unstable playback, poor framing and switching to the wrong source. They often happen when separate parts of the production aren’t tested together. For example, a presentation may look correct on the operator’s monitor but appear cropped to online viewers. Watch the outgoing stream on a separate device to see what the audience receives.
How do you prevent audio problems during a live stream?
Choose a microphone suited to the speaker and room, then listen for changes as the programme moves between speakers. A lavalier mic can suit a presenter who needs to move, while a fixed microphone may work for a seated discussion. Keep spare batteries for wireless microphones. Ask a team member to monitor the mix throughout, especially during handovers and audience questions.
What causes video, lighting, and camera issues in live streams?
Backlighting, obstructed lenses, loose connections and mismatched display settings can all affect the picture. A bright window behind a presenter, for instance, can leave their face underexposed. Position the camera so the main light falls on the subject, keep walkways clear of equipment and check the frame from the audience’s perspective. For multiple cameras, label each source to make shot selection clear.
How can you test internet bandwidth and prevent stream dropouts?
Test upload performance at the venue using the connection planned for the broadcast, then repeat while other event activity is running. A stable 5 Mbps upload speed or more is a useful starting point for simple HD streaming, but the required capacity depends on stream settings and competing network use. Prefer a wired connection where possible, and reduce encoder bitrate if testing shows playback interruptions.
What pre-stream checklist helps catch production errors?
Use a written checklist that follows the event sequence, from opening graphics to final sign-off. Confirm that the camera framing, microphone feed, playback files and presentation sources are ready. Check that the host and operator know their cues, and that the stream reaches its intended audience. Finish by rehearsing transitions, including what to do if a source fails.
Comments